The aim of this part of the page is to help with Optimization of the SETI client software to enable our members to become more competitive.
There are countless sites offering information on SETI client optimization. The official SETI site offers a lot of useful information as well. The ultimate resource on SETI@home is the SETI@home FAQ. SETI@home GUI program While the following is rather beaten to death by now :) it definitely bears repeating: if for some reason you cannot process SETI@home 24 hours a day, or if your computer is insufficient in power for concurrent operation with your regular productivity software (or has less than 64MB of RAM), then you should run it as screensaver, while setting it to go to blank screen after zero (0) minutes.
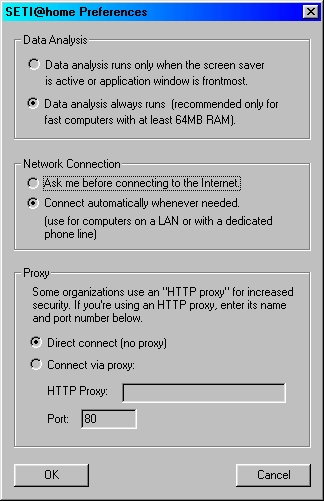
Naturally, this is not the best way to propel our glorious team to the top, so if you can afford to, please replace the SETI@home screensaver with any other screensaver (preferably a blank one), and run the GUI version in the background all the time. In the preference settings choose the following settings. If you have one of the latest Pentiums, you can certainly afford to do this without sustaining much slowdown. For Win95, 98 or WinNT the latest version is currently version 3.03
(adopted from Henry's old IsraAliens page)
Hiding SETI@home clients on computers at work By Sami Gabizon The procedure I'm outlining here has been tested and worked on every win95/98 I installed it on. I think it'll work on NT as well, with minor changes, but I strongly recommend testing it for some time on a single computer and then continue to others.
Steps to follow in the first (or test) computer. These steps you do only once because after that you'll only copy the directory with all its contents to the other computers.
1. Create a subdirectory named SHELLSET (or any other unsuspicious name you come up with) under the SYSTEM (or SYSTEM32) directory in the WINDOWS directory. In this subdir (we'll call it setidir from now) the seti client will run.
2. Copy the Seti client to setidir and rename it to shellrun.exe (again - something unsuspicious). This is important because, when the client will be hidden, it will be visible in the running processes list, so choosing an unsuspicious name is crucial in undetction.
3. copy SetiSpy to setidir. I chose to rename it also because i didn't want any program in the computer to start with seti. It is not necessary, but it is a result of experience (someone once found SetiSpy by using find files with seti* and deleted it).
4. From any running client, copy the "state.sah" and the "user_info.sah" files to setidir. "user_info.sah" is necessary for the client to automatically connect to the seti server the first time you'll run it. The "state.sah" file is needed to prevent SetiSpy from displaying an error message about not finding the "state.sah" file. As of version 2.5.1 of SetiSpy, there is an option to ignore the presence of state file on (SetiSpy's) startup. This option is needed because from time to time there is a connection problem that causes the client to stop running after it completed a WU, sent its result file but not been able to get a new WU. This leaves the setidir with no state.sah file and the next time SetiSpy (prior to version 2.5.1) run, an error message is displayed on the screen - which ofcourse exposes the fact that a seti client or something is running on the p.c.
5. Run SetiSpy. Now, because it is the first time SetiSpy is launched a disclaimer window will be shown. Choosing "Agree" will get you to the first page of info on the current WU. This disclaimer is only shown when there is no "setispy.ini" file in the directory in which SetiSpy is run from.
6. Go to the Client page and into Configure. Enter the client path, any client parameters if you need some (the proxy for example) and **VERY IMPORTANT** the client window title. This is the name that is shown in the title of the client when it runs. If you renamed the client to shellrun.exe then the title will be : shellrun (to be sure, run the client and see). Now check the "This is the full title". The "Keep alive" section is needed if you want SetiSpy to run always (I don't use it). In the "Client control" check "Hide client after (re)start", "Restore client minimized" and "Start client on SETI Spy start". Press the "OK" and you'll return to the Client page. You can test your configuration by pressing "(Re)start". You should see the client launched on the taskbar and then disappear. Notice the check that appeared in "Hide client". You can uncheck it to see the client running and check it again to again hide it. Just don't forget to leave it checked.
7. Go to the Setup page. This page is mainly for the operation behaviour of SetiSpy. The most important here is in the Client section: PUT A CHECK IN "Ignore presence of state file on startup".
8. Now exit SetiSpy. A setispy.ini file is generated in setidir and it should look like the following:
[SETI Spy]
DisclaimerAccepted=1
NewIniFile=1
Anniversary=1
NewLogFile=1
Top=591
Left=314
ActivePage=5
LastCompletedWUName=
[CPU]
CPUType=Intel Pentium III (Coppermine) processor
L1CodeCacheSize=16
L1DataCacheSize=16
L2CacheSize=256
CPUSpeed=736071987
[Setup]AlwaysOnTop=0
MinimizeToTray=1
RunInTray=1
TimeOut=5
Description=
AutoUpdateStats=0
StatsUpdateTime=24
UseProxy=0
ProxyName=
ProxyPort=0
ShowTweakInfo=0
TooltipInfo=0
SaveWindowPos=1
CloseToTray=0
PollInterval=1
CheckForStateFile=0
CompletePercentage=97.806
NotifyForUpgrade=0
ConnectForStatsUpdate=0
UseWindowsProxySettings=0
AutoSaveBestGaussian=0
AutoSaveReturnedGaussians=0
AutoSaveGraphFormat=0
AutoSaveGraphSize=0
AutoSaveFolder=
[Client]
OSVersion=Windows 98
PhysicalMemory=130552
KeepClientAlive=0
HideClientOnStart=1
RestartClientWhenIdle=0
ClientCheckInterval=5
ClientPath=C:.exe
ClientParams=
ClientWindowText=shellrun
CloseClientOnExit=0
OpenClientOnStart=1
MinimizeClientOnRestore=1
MatchFullClientWindowText=0
[Stats]
ResultsReturned=-1
LastResultTime=0
TotalCPUTime=0
AvgCPUTime=0
ResultInterval=0
TotalUsers=0
UserRank=0
UserPercentage=0
GroupName=
GroupURL=
9. If all is well, you have created a configuration to run the client hidden. Now you have to decide how to run SetiSpy. There is an option to run it all the time and an option to run it for a brief time just to hide the client without it staying resident. I chose the second option for the following reasons: a) I don't want more than one extra program to show in the process list if someone hit the ALT-CTRL-DEL. b) The connection to the Internet in my work is stable most of the time, so I don't need SetiSpy to monitor the client's progress and administer it if it fails to connect. c) Last but most important for you NT users, I don't know if SetiSpy is able to run as a sevice with no visible icon in the task bar. I have asked the creator of SetiSpy (Roelof J. Engelbrecht) if he can implement an option to run SetiSpy without the icon visible. He answered that It is a little complicated for him (something about tweaking the windows messaging subsystem), so he didn't promise anything. Maybe the next versions will have this capability.
10. The next thing you have to decide is where to put the command to launch SetiSpy. One option and this is my chosen one, is to put the appropriate line in the registry, under run services key
(HKEY_LOCAL_MACHINE\Software\Microsoft\Windows\CurrentVersion\RunServices). This is better than the run key
(HKEY_LOCAL_MACHINE\Software\Microsoft\Windows\CurrentVersion\Run) because when the computer starts, it stops at a login screen. All programs in the Runservices key will run even if nobody logs in to the computer. Only after the login takes place all programs under the Run key are executed. If you have a computer that nobody works on for sometime in a day, then you'll have to use the RunServices key. But if there is no such key under winNT, either look for the right key or use the run key. If that key also is not to be found in NT, then you have other three options. a) Use the Task Scheduler (but then the command will be visible to anyone who opens it). b) Use the StartUp folder (again, visible). c) Put the line in the "win.ini" file (Run=...).
11. After you decided where to put the call for SetiSpy, this is my recommended line. Note the use of the "-loader" option:
c:\windows\system\shellset\setispy.exe -loader c:\windows\system\shellset\
12. There is a problem to close the client when the user shuts down the computer under win95/98. I don't know if the problem exists under WinNT, but in any case there is a solution at least under win9x. Copy from the \windows\system directory a program named "conagent.exe" to the setidir directory. Enter its properties and uncheck "Warn if still active" in the Termination section of the Misc page. This will allow the client to be closed quietly. I think there is another way to do it under WinNT, but I don't know how.
At this point you have one computer configured for running seti hidden. This is the time to test it working under some special conditions. For example: restart the computer and watch carefully how SetiSpy launches the client. There is a brief moment both SetiSpy and the client are visible in the task bar, then they both disappear, but it is hardly noticeable by the average user. Make sure the client is running at startup. Exit windows in all sorts of way: by shutdown and then restart, by restart the computer, by pressing the resset button (users do that from time to time) etc. In each case, make sure the pc recovers and the client is running hidden and unnoticeable.
After making sure that SetiSpy is working o.k. , you can copy the setidir directory to other computers. You must replace the work unit in the other computers. These 2 steps (copying the setidir directory and replacing the WU) you can do from your computer provided that you have administartor capabilities. The only thing you have to do in the other computer is putting the launch line where you decided to put it (If it is in the registry. Otherwise, you can do even this step from your pc).
This concludes the procedure I have implemented in my work.
TIP: If you have users who shuts down their pc at the end of the day, you might consider configuring the pc bios (under the power section), to automatically restart the computer at a specified time.
Hope it is detailed enough.
Sami. Remarks I tried to impelement the above on WinNT 4. In about 1 out of 5 boot ups, SETI Spy failed to hide the client before it exited, as explained at step 11 and the later eplanation.
Also, Both keys Sami mentioned exist in WinNT 4. Tsahi Asher
CLI SETI@home program without a modem or on a network with limited NET access
One of the advantages of the CLI version of the program is that one can run
multiple instances of SETI on the same computer, especially if that computer has
more than one processor. The CLI version is easier to configure to run using the
Windows 98 task scheduler, because it does not need to be minimized while it is
running to process at full speed. If your computers do not all have a modem, use
the CLI version and download work units on a computer with the Internet access.
Then, transfer the whole directory containing CLI executable and the text data
and settings files to another computer without a modem. Once the work unit
processing is finished, simply copy that whole directory back to the computer
with Internet access (on a floppy if you wish) and send the WU off to SETI by
running the program on that computer. This will download another unit in return;
then repeat the whole routine.
If you have access to computers at your workplace and do not think that
company policy will "accommodate" this little project of ours :) try to run the
program at night, using task scheduling.
If your computer network does not have shared access to the 'net, but at least
one computer on the network does, then create many directories on a sharable
network drive and then execute the various instances of CLI client from the
various computers on the network, using task scheduling. When the units are
done processing, simply use the workstation with the 'net access and send the
results back.
From Henry's old IsraAliens page
|